Ingredients:
- ~7 tomatoes
- 1 purple onion
- 1 red bell pepper (I used orange)
- 1 hot pepper, seeds removed
- 2 cucumbers, peeled
- 4 cloves of garlic
- Fresh basil
- Fresh parsley
- 1/3 C red wine vinegar
- 1/3 C EVOO, the best you can get
- Juice of one lime (you can substitute a lemon or storebought lemon juice if necessary, but I love the lime)
- fresh ground pepper
- ~1 T kosher salt
- ~2 t cumin (optional)
Directions:
I had a lot of tomatoes to use up (doesn't everyone right now?), and a friend on facebook posted about gazpacho, which reminded me how we had liked it when my husband made it last year, and so I made some. Last summer when the hubs made it, I wasn't even home, so this totally counts for being my first time making it. I didn't get his help at all, and did it all by myself! The only thing he did was toast some bread, which is the totally perfect and necessary complement to gazpacho - really good, crusty bread.
First I read over some recipes online.
Then I bought a few necessary ingredients that I didn't have on hand (orange bell pepper (to add color other than red), purple onion, parsley). Then I got to work.
This recipe requires no cooking, but it's still a pretty hefty workload. I decided to be a bit lazy and use my mini-food processor attachment to my stick blender so that I didn't have to worry about finely chopping anything. It worked out very well; in fact, when he had his first bite, my hubby commented that the texture was wonderful, right after he said how delicious and perfect it was.
So basically I just roughly chunked stuff up and popped it into the processor in manageable batches. For the less juicy stuff, I added a tablespoon or two of the red wine vinegar or EVOO to keep things moving in the blender. And to imitate the other recipes' advice to only blend part of the resulting mix, I tried to leave some batches of each veggie a little chunkier while making sure other batches were fairly smooth. I even put the basil and parsley in a batch with the garlic and some EVOO, so there was really as little chopping as I could wrangle.
I dumped everything into a big glass bowl that I have a lid for, and once it was all in there I added a generous amount of salt (because tomatoes love salt!), some freshly ground cumin (the hubby's fav spice, and I think it is indispensable here), and many grinds of the pepper mill. If you don't love cumin enough to grind it fresh like we do, you might even want to add extra, because it is seriously the perfect je ne sais quoi that takes this over the top.
Since there's no other fat in the whole thing, I didn't feel remotely guilty about the 1/3 cup of EVOO. It gives just enough richness to make this very veggie cold soup taste like a meal and not just like watery salsa. Grab a few slices of your favorite crusty bread and dig in!
One recipe mentioned avocado, and while I didn't want to experiment that much with my first try, I love avocado, so I bought one and included it sliced up with the bread as part of the side dish. The bites where I put a piece of avocado onto the bread and ate it all at once with the soup? Transcendent. This was one seriously delicious dinner. I never once thought to myself "it's weird to be eating completely raw, room temperature food for dinner."
Since all the recipes say to let it sit overnight in the fridge, or at least for an hour, I was expecting it to be even better today for lunch, and it was! So don't hesitate to make enough to last for a few days. You won't regret it, and your overflowing supply of tomatoes will thank you!
Was the recipe easy to follow? Yes, especially since there were no cooking times or temperatures to worry about!
Did it taste good? Um, yes.
Would you make it again? Yup!
Thursday, August 13, 2009
Friday, August 7, 2009
Chicken Parmesan with Fresh Tomato Sauce

I had a lot of tomatoes from my CSA and friends' gardens, so I knew it was time to try making my own tomato sauce for the first time.
I decided to not use a recipe at all, and just put a few ingredients that I knew would work together and see how it turned out. It worked pretty well!
Ingredients:
- Tomatoes. I had what amounted to about 2.5 quarts, I think. Various types.
- 1 onion
- Garlic. I used 5 or 6 cloves.
- 1 6 oz can Contadina Tomato Paste (only brand I know that has no ingredients other than TOMATOES)
- Extra Virgin Olive Oil
- Fresh Basil
- Salt
- Pepper
- 2 boneless chicken breast halves
- flour
- breadcrumbs
- milk (I used skim, and it worked just fine!)
- Freshly-grated parmesan cheese
Here's what I did:
Chopped up all the tomatoes as small as I could. I kept all seeds and skin, and only discarded the stems, bad spots, and a couple of under-ripe bits if they were too hard.
Heat a few Tablespoons of EVOO in the bottom of a wide sauce pan or skilled (I used my chef's pan). Add all the tomatoes, juice and all. Add lots of salt and plenty of pepper, to taste.
Once the tomatoes have started to head up, add the tomato paste and stir to dissolve it.
While that bubbles, chop up the onion and garlic. Heat up a little more EVOO in a skillet (you can use the same skillet for the chicken in a few minutes). Sautee the onions & garlic separately until they're fully cooked and slightly browned, then dump them into the bigger pot with the tomatoes.
This is probably a good time to pre-heat your oven to 375 degrees.
While the onions & garlic are cooking and the tomatoes continue to simmer, prepare the chicken:
Rinse & dry each piece. Pound them a little so they're a bit thinner - mine weren't too thin, just about 1/2 or 3/4" - it doesn't matter, I just wanted to flatten them out a bit.
Use two salad plates and cover each with a few heaping Tablespoons of flour and breadcrumbs, respectively. Add some salt and pepper to each plate (unless your breadcrumbs already have salt!). Put some milk in a shallow bowl.
Dip each piece of meat into the flour (flip it to cover all surfaces), then into the milk quickly, then in the breadcrumbs (again turning to coat fully). This should give you a thin but complete layer of breading.
Once the onions & garlic are done cooking and have been added to the tomatoes, put a little more EVOO into the now-empty skillet, heat it, and add the chicken breasts. Cook for a few minutes on each side until they're nicely browned, crispy, and cooked through. Set aside until the sauce is ready.
The sauce is ready whenever you think it's ready: I just cooked it until it was a bit thicker and reduced, pleasantly chunky but still with plenty of liquid, and obviously very cooked because the tomatoes were all mushy and it looked like, well, tomato sauce! At this point I tossed a bunch of fresh basil into the pot (stack a bunch of basil leaves, roll them up, and slice thinnly), tasted it, and added a bit more salt and pepper.
Once the sauce is ready to go, spread a generous layer of sauce in the bottom of a glass baking dish (I used a small dish since I only had 2 pieces of chicken).
Grate some fresh parmesan onto both chicken breasts and place that side down in the sauce in the baking dish. Generously grate more parmesan over the chicken, put a little dollop of sauce on top of each piece, and pop it in the oven, uncovered, for 15-20 minutes or until cheese is all melted and sauce is bubbley.
Scoop onto dinner plates, including all the sauce in the baking dish, add some crusty bread, and enjoy!
I made way more sauce than I used for the actual Chicken Parmesan. I've never made either fresh tomato sauce OR Chicken Parmesan before, so it was a fun evening!
The rest of the sauce is in my fridge, in one container for me and another container to go to someone who gave me some of the tomatoes.
Was the recipe easy to follow? I wish I had thought through the steps in a little bit more detail before I dove in, but it all worked out in the end, so yeah.
Did it taste good? Extra-delicious because I knew all the tomatoes were grown within 30 miles of my house using no chemicals at all! The EVOO probably didn't hurt either.
Would you make it again? Definitely. I anticipate getting tons more tomatoes over the next month, so the sauce will probably become a frequent task. I plan to put it over pasta, other meats, and hopefully a homemade pizza in the near future! We eat a lot of chicken, though, so this will very likely be repeated in the near future. Other than chopping up all the tomatoes, this was really quite easy to make.
I was thinking a bell pepper wouldn't be amiss in the sauce, and some white wine would be another great addition - next time I'm planning to use the wine to deglaze the pan after cooking the onions, garlic, and chicken. Adding all that crispy goodness with the wine to the sauce would take the flavor to a whole new level!
It's a good thing there's sauce leftover to look forward to for dinner this weekend.
Thursday, July 30, 2009
Three-cheese Veggie Strata

Ingredients:
- 2/3 stale baguette, sliced
- 1 onion
- 2 chili peppers
- 5 small tomatoes
- 10 mozzarella balls, quartered
- 3 eggs
- 1 C ricotta cheese
- 2 C milk
- Parmesan cheese
- Salt
- Pepper
Here's the story: I had a bunch of stuff I needed to use up. Among these were a partial and very stale baguette, and three eggs that had been hanging out in my fridge too long. Stale bread and eggs spells Strata, so that's what I made!
Preheat your oven to 350 degrees
Butter the bottom of a round, deep 4-quart casserole dish
Slice up the baguette enough to cover the bottom of the casserole dish, then roughly chop the rest into crumbs and dump those in to fill in the holes
Dice up the onion, peppers (remove seeds), and tomatoes and spread it over the bread
Sprinkle with salt & pepper to taste (keep in mind you're adding more s&p later)
Quarter the mozzarella balls and press those into the top
Break eggs into a 4-cup liquid measure and beat them
Add ricotta and mix in with the eggs until smooth
Add salt & pepper to taste
Add milk until the total volume is 4 cups
Stir/beat until smooth
Pour slowly over the stuff in the casserole dish, giving it time to soak in to the bottom
Sprinkle the top with parmesan, and additional salt & pepper if desired
Pop it in the oven, uncovered, for about 70 minutes or until the top is browned, edges are bubbly, and the middle has puffed up a bit
Remove and let sit for ten minutes
Scoop & serve with a big spoon!
I'm quite sure this would do very well as a make-ahead, spending one night in your fridge before baking.
Was the recipe easy to follow? I made it up as I went, so...yeah.
Did it taste good? Goodness, yes. You could pour 3 cheeses and some egg over just about anything and it would taste good.
Would you make it again? This was one of my semi-regular episodes of throwing everything I need to use into a casserole dish (or saute pan, or baking dish, or whatever makes sense for what I have) and calling it dinner. So, probably not exactly this, but I'm sure I'll keep using the same strategy over and over, and strata is often what comes out if we have old bread and eggs on hand! This particular version would have also been great with some additional herbs (basil, maybe?) or some protein (crab or bacon comes to mind, or some sausage).

Friday, July 24, 2009
Kohlrabi & Avocado Salad
The original recipe is here.

Ingredients:
- 3 medium Kohlrabi bulbs
- 2 ripe Avocados
- 3 Tablespoons Lime Juice
- 1 Scallion, chopped
- 2 Tablespoons Balsamic Vinegar
- 6 Tablespoons extra-virgin Olive Oil
- 1/4 teaspoon Garlic Powder
- Salt
- Fresh ground Pepper
- 1/4 cup crumbled Feta Cheese
Chop it up, mix it up, and serve. Yum.
My sister discovered this recipe after we got Kohlrabi from our farm share and had no idea what to do with it, having never heard of it before. So I'd eaten hers twice before I made it for myself last night.
I had only 2 kohlrabi bulbs, and 3 avocados, so that's what I used. I also didn't have scallions, but chose to use fresh garlic instead of powder, so I think the zing of fresh garlic mostly made up for the lack of scallions.
I also used an entire lime, since I just love all things lime lately, and the rest of the ingredients I didn't measure - just drizzled in what felt right. We didn't have any feta cheese, but I certainly didn't miss it, and even though I love feta in general, I didn't love it with this salad the first time Hannah made it, so no loss.
The main thing you definitely want to change about the recipe above is the amount of EVOO. Use less, no more than half as much. It is way too oily otherwise. The avocado adds fat already, so you don't need the extra oil for flavor.
And finally, my avocados were very soft, and I stirred things a little more than I should have, so the avocado cubes mostly got mushed up. Next time I'd hope for slightly firmer avocados (it can be really hit-or-miss with the grocery store's selection) and I wouldn't mix it up after each ingredient - I'd toss the avocado and kohlrabi with the lime juice (to keep them from turning brown, especially the avocado) and then wait to toss everything again until all the rest of the ingredients had been added.
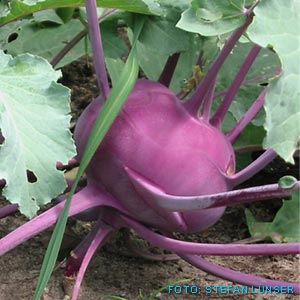
Assuming most of you have never heard of Kohlrabi either, it is crunchy and white inside, a lot like jicama, altho it's supposed to taste more like broccoli (but I don't really taste the resemblance, which is good, because I don't much like broccoli). It looks like this, although the ones we've been getting are actually purple on the outside, and more bulbous - this picture makes them look more like brussles sprouts or something, which they don't at all. And if they're not trimmed, those little stalks are just the bottom of big leaves. Aah, here's a better picture:
Anywho, the questions:
Was the recipe easy to follow? You betcha!
Did it taste good? It sure did! It's a new family summer favorite, in fact.
Would you make it again? I'll probably keep making it as long as the CSA keeps giving us kohlrabi!

Ingredients:
- 3 medium Kohlrabi bulbs
- 2 ripe Avocados
- 3 Tablespoons Lime Juice
- 1 Scallion, chopped
- 2 Tablespoons Balsamic Vinegar
- 6 Tablespoons extra-virgin Olive Oil
- 1/4 teaspoon Garlic Powder
- Salt
- Fresh ground Pepper
- 1/4 cup crumbled Feta Cheese
Chop it up, mix it up, and serve. Yum.
My sister discovered this recipe after we got Kohlrabi from our farm share and had no idea what to do with it, having never heard of it before. So I'd eaten hers twice before I made it for myself last night.
I had only 2 kohlrabi bulbs, and 3 avocados, so that's what I used. I also didn't have scallions, but chose to use fresh garlic instead of powder, so I think the zing of fresh garlic mostly made up for the lack of scallions.
I also used an entire lime, since I just love all things lime lately, and the rest of the ingredients I didn't measure - just drizzled in what felt right. We didn't have any feta cheese, but I certainly didn't miss it, and even though I love feta in general, I didn't love it with this salad the first time Hannah made it, so no loss.
The main thing you definitely want to change about the recipe above is the amount of EVOO. Use less, no more than half as much. It is way too oily otherwise. The avocado adds fat already, so you don't need the extra oil for flavor.
And finally, my avocados were very soft, and I stirred things a little more than I should have, so the avocado cubes mostly got mushed up. Next time I'd hope for slightly firmer avocados (it can be really hit-or-miss with the grocery store's selection) and I wouldn't mix it up after each ingredient - I'd toss the avocado and kohlrabi with the lime juice (to keep them from turning brown, especially the avocado) and then wait to toss everything again until all the rest of the ingredients had been added.
Assuming most of you have never heard of Kohlrabi either, it is crunchy and white inside, a lot like jicama, altho it's supposed to taste more like broccoli (but I don't really taste the resemblance, which is good, because I don't much like broccoli). It looks like this, although the ones we've been getting are actually purple on the outside, and more bulbous - this picture makes them look more like brussles sprouts or something, which they don't at all. And if they're not trimmed, those little stalks are just the bottom of big leaves. Aah, here's a better picture:
Anywho, the questions:
Was the recipe easy to follow? You betcha!
Did it taste good? It sure did! It's a new family summer favorite, in fact.
Would you make it again? I'll probably keep making it as long as the CSA keeps giving us kohlrabi!
Thursday, July 9, 2009
Sloppy Joe
Believe it or not, I had never made this for myself before. As in, from scratch, not from a can. Well, let me say, it's a great crock pot dish for a picnic or outdoor party.
Ingredients:
3.5 lbs lean ground beef
2 onions, diced
2 green bell peppers, diced
3 cloves garlic, minced (or more, to taste)
1 can (12 oz) Contadina tomato paste
1 jar medium salsa (your favorite salsa - mild is fine too, or super hot!)
1/8 c ketchup
1/4 c grainy mustard
1 Tbsp mustard powder (or more, to taste)
1 tsp garlic powder
Freshly ground pepper to taste
Cook onions and bell peppers in a little bit of olive oil until tender.
Add minced garlic & cook for a few more seconds
Add ground beef; continue to cook until beef is done.
Use a slotted spoon to transfer everything from the pan into the crock pot, leaving behind all the liquid fat and other juices.
Add the remaining ingredients and mix thoroughly.
Set your crock pot for whatever length you like (how long until you want to eat dinner?); I did 4 hours.
If your sloppy joe has liquid sitting on top, it's probably from the salsa. Just cock the lid for a while until it cooks off.
Serve on a hamburger bun or your favorite sandwich bread - I used whole wheat sliders (mini hamburger buns), and it was delish! Another serving suggestion: cole slaw, on the side or right on top. Or cheddar cheese. Or whatever you want.
This makes a lot, but it is definitely freeze-able, or good for a big party, or great as leftovers all week long. Also great for re-purposing as a pizza topping, into a casserole, on a baked potato, over pasta (I can vouch for the yumminess of sloppy joe pasta sauce, which I did later in the week)...use your imagination!
I specifically mentioned Contadina tomato paste for two reasons: first, I wanted more than those tiny cans or tubes, and this was the only brand at my supermarket in a bigger can; and second, because of the ingredients: tomatoes. No preservatives, no salt, no spices - the lable says simply, "Ingredients: tomatoes." And that's what I like to see. I can add my own spices, thank you very much! Also, the recipes I looked at all called for lots of ketchup, but I love the richness of tomato paste, so I used it instead and added the salsa for some additional liquid (or my "sloppy joes" would have just been "joes" because they would have been so dry!)
Was the recipe easy to follow? Yup! Another simple one cobbled together from online recipes based on what I thought sounded good.
Did it taste good? It did, and it does! I'm looking forward to leftovers tonight.
Would I make it again? Definitely! Might even branch out with some additional ingredients, like mushrooms (which I forgot to buy, whoops!), or try it with ground turkey instead. Or try a vegan version with chopped-up mushrooms and black beans instead of meat!
Thursday, July 2, 2009
Sangria

Ingredients:
1 bottle dry red wine (750 ml is standard bottle size) (I used a cheap red table wine)
2 c gingerale
1 c orange juice
1/2 c brandy (you can use cheapo stuff for this recipe)
1/2 c cointreau (triple sec is also fine, I just had cointreau on hand)
1 lemon, sliced
1 orange, sliced
2 limes, sliced
1 big, glass pitcher (so you can see the pretty citrus slices!)
The sliced citrus fruit is mainly for decoration - just slice it with the skin on (make sure to wash first and peel off any stickers), throw away the very ends, and toss all those pretty cross-sections into your pitcher.
Add the rest of the liquid ingredients.
Stir well.
Pop it in the fridge, and serve it cold! Over ice or straight.
One tip: I know from puting whole citrus fruit into tea that you don't want to make it way ahead of time, or the skin on the fruit will end up making the whole thing taste bitter. It takes a while for this to happen, so it will still taste great for your whole party, but if you want to make it ahead of time just don't add the fruit until the end. Better to refrigerate all the ingredients separately and then throw it together right before you serve it. It won't last long, trust me. This stuff goes down WAY too easy.
I've loved Sangria for a year or so, and was reminded how easy it would be to make myself when I went to my cousin's baby shower. Her mother-in-law makes some REALLY delicious sangria. I may or may not have had two full cups, in those BIG plastic party cups. YUM.
I was having a little gathering recently and decided to make it for myself, so I looked at a few recipes for it on allrecipes.com, and just kind of cobbled together what sounded good to me. I decided to go with all citrus and no apples or strawberries etc. just for the look of it, but other recipes call for additional fruit as well. I did NOT use simple syrup or sugar (I know the baby shower sangria had simple syrup in it) because I like the dry red wine still discernable, plus I figured there was plenty of sweetness already being added from the liquor, OJ, and gingerale. I was right. So I say NO to adding additional sugar!
I still want to get a hold of my cousin's mother-in-law's recipe, which I believe was simpler, but this was DELISH and I would make it again in a heartbeat. It was a really big hit at the party too - even the two pregnant ladies each had to try a teensy sip!
Was the recipe easy to follow? Heck yes! You just measure, pour, and stir.
Did it taste good? Way too good for my own good! Luckily at this party I was playing the hostess, so I only ended up having one small-ish glass because I wanted everyone else to be able to enjoy it! Next time I'll buy a double bottle of wine and make twice as much.
Would I make it again? I think I've answered this question already, don't you? I might even make it again tonight, all for myself.
Monday, June 22, 2009
Whip It Up 2009 is almost here!
Next week starts Whip It Up 2009! I'll be posting one recipe per week on this blog, and I'm pretty sure all of my recipes will include veggies (and/or fruit!) from our CSA subscription. So exciting!
My only worry is the electric range. So far, I haven't cooked on it enough times to get REALLY frustrated, but just enough that I am planning to avoid cooking anything complicated until we get the propane range. I've already burned rice twice, so next time I'm reverting to the oven method that saved me at our VA apartment, which also had an electric range: preheat the oven to 375, and once the rice boils, pop on the lid and stick it in the oven. Otherwise it gets too much direct heat on the bottom of the pot!
One thing I will have to wait for the propane range to make: cream sauces. Too finicky for electric! I think when we do get the propane range, I will celebrate by making Portobello Mushroom Lasagna from Ina Garten via RA during Whip It Up 2008. And hopefully I'll use the loaf pans to make individual lasagnas again, since it worked out so well a few years ago and I haven't gotten around to trying it again. Yay for delicious gift-giving!
Friday, April 17, 2009
Lemon Cornmeal Cake
I don't have my own picture to post because we've already eaten it all up. So yummy!
My new favorite thing is lemon and lime desserts. They're so refreshing! I love a few bites of a rich, chocolate dessert, but it doesn't have the staying power of a tart, sweet, citrucy lemon cake.
This was so easy and pretty, I highly recommend it for your next brunch. I used the leftover crushed blueberry sauce in my oatmeal all this week, too.
Without further ado, I give you Lemon Cornmeal Cake!
I followed the recipe exactly (one exception: I had white cornmeal, not yellow, but it's the same thing, and the barely-yellow color in the resulting cake was so pretty that I'd even recommend white cornmeal if you have it!), although next time I would use less sugar all around, and I'd make less glaze and thin it out more with additional lemon juice.
I recommend juicing an entire two lemons into a bowl, after zesting them both to get the full tablespoon of zest you need for the cake, plus some more for the sauce. Then whatever juice you have leftover from the cake and glaze (I used more than it called for already, and would use even more next time with less sugar for a thinner glaze), just dump the rest into the blueberries and cook it until you have the consistency you want.
The blueberry sauce does great in the fridge for a week, and probably more, but here's betting it won't last that long! Using brown sugar with the blueberries is inspired. And the dark purple texture of the blueberry sauce against the barely-yellow cake and white glaze is so pretty! But not quite too pretty to eat. YUM!
Tuesday, February 24, 2009
Spice-crusted Cauliflower & Broccoli and Gyros
Paul made it, and followed this recipe pretty much exactly. It was so delish!! The spices were just wonderful. Mild and delightful, and so flavorful! Yum.
Two nights ago Paul defrosted the lamb we had in the freezer, ground it up with the Kitchenaid attachment, and made us Gyro meat using this recipe to go with the tzatziki sauce I had made using this recipe. I used fat free Greek yogurt, so I didn't have to drain it at all. Also, I just shredded my cucumbers with the bigger side of a box grater, didn't even bother to remove the seeds. It was QUITE delish, although of course not nearly as healthy as tonight's dish.
Hope you enjoy! I especially recommend the spiced Cauliflower & Broccoli. That reminds me: I really want to try my sister's cauliflower curry!!
Monday, February 16, 2009
Chiang Mer II
Tried it again, this time including mushrooms and cilantro as promised. But I also added a full 6oz can of tomato paste and a drained 14.5oz can of diced tomatoes (no salt added). Then I made one other change, after Paul surprisingly was willing to try it: I used extra-firm tofu instead of chicken.
Ingredients:
EVOO
1 onion, diced
2 or 3 carrots, diced
1 to 3 cloves of garlic, finely diced, or to taste
1 package pre-sliced baby bella mushrooms (or plain ol' white mushrooms)
1 pack or two handfuls fresh cilantro, roughly chopped
1 pack extra-firm tofu
1 6-oz can tomato paste
1 14.5-oz can diced tomatoes (no salt added)
4 to 5 Tablespoons of mild curry paste
1/2 pack (1/2 lb) spaghetti or fetuccini

Please ignore the indisputable proof of my alcoholism in the background and just focus on the foreground.
Drain tofu, slice into cubes, and spread in an even layer on paper towels. Top with a cutting board (or something flat and stiff) and top with a few heavy kitchen objects. This is to press the tofu a bit and get out all the extra moisture. Leave it like this until you're ready to cook it.
Next put the water on to boil for the pasta. The rest of the meal should take just a little longer to cook than the time to cook the pasta start to finish.
Sauté the onions, carrots, garlic, and mushrooms in a teensy bit of EVOO until soft. Add tofu and continue to cook until tofu is heated and veggies are starting to brown.
Add curry paste and stir to coat everything. Cook until heated.
Add tomato paste and stir to coat everything again; keep cooking!
Add diced tomatoes, and cook until everything is hot.
At this point, pasta should be finished cooking and drained; add it to the pan and stir it all up. Remove from heat and serve!
The curry paste I use has PLENTY of salt in it, so I haven't added any anywhere else; also, it's spicy enough for me already, so I didn't add any pepper, but you certainly could, or you could use a hotter curry paste to begin with.
We both liked the tofu! It basically had the consistency of mild cheese like you get in some Indian dishes, and tasted like the sauce. And it was much healthier for us! I'm excited and plan to purchase extra-firm tofu to substitute in to more dishes from now on. I'm also excited that we now have a really delicious and not-too-difficult dish we could prepare for a vegan guest.

Yum!
Ingredients:
EVOO
1 onion, diced
2 or 3 carrots, diced
1 to 3 cloves of garlic, finely diced, or to taste
1 package pre-sliced baby bella mushrooms (or plain ol' white mushrooms)
1 pack or two handfuls fresh cilantro, roughly chopped
1 pack extra-firm tofu
1 6-oz can tomato paste
1 14.5-oz can diced tomatoes (no salt added)
4 to 5 Tablespoons of mild curry paste
1/2 pack (1/2 lb) spaghetti or fetuccini
Please ignore the indisputable proof of my alcoholism in the background and just focus on the foreground.
Drain tofu, slice into cubes, and spread in an even layer on paper towels. Top with a cutting board (or something flat and stiff) and top with a few heavy kitchen objects. This is to press the tofu a bit and get out all the extra moisture. Leave it like this until you're ready to cook it.
Next put the water on to boil for the pasta. The rest of the meal should take just a little longer to cook than the time to cook the pasta start to finish.
Sauté the onions, carrots, garlic, and mushrooms in a teensy bit of EVOO until soft. Add tofu and continue to cook until tofu is heated and veggies are starting to brown.
Add curry paste and stir to coat everything. Cook until heated.
Add tomato paste and stir to coat everything again; keep cooking!
Add diced tomatoes, and cook until everything is hot.
At this point, pasta should be finished cooking and drained; add it to the pan and stir it all up. Remove from heat and serve!
The curry paste I use has PLENTY of salt in it, so I haven't added any anywhere else; also, it's spicy enough for me already, so I didn't add any pepper, but you certainly could, or you could use a hotter curry paste to begin with.
We both liked the tofu! It basically had the consistency of mild cheese like you get in some Indian dishes, and tasted like the sauce. And it was much healthier for us! I'm excited and plan to purchase extra-firm tofu to substitute in to more dishes from now on. I'm also excited that we now have a really delicious and not-too-difficult dish we could prepare for a vegan guest.
Yum!
Monday, January 26, 2009
Mushroom Risotto
Very simple this time, I used this recipe with very few changes:
I used a 1 lb box of arborio rice plus 1 qt (4 cups) of mushroom stock
For the mushrooms I used two containers from Giant: one of sliced baby bellas, and the other a mix of crimini/oyster/shitake.
The mushroom stock didn't come in low sodium, so I just didn't add any more salt, but next time I'd stick with chicken stock. I just wanted to try out the mushroom stock, I've been eyeing it up at Wegman's for months.
All other portions I kept identical, including the 1/2 c dry white wine, so no need to reduce any other ingredients just because I used less rice. I also used 3 shallots, and I wish I had added a couple cloves of garlic.
I did follow the recipe's suggestion of removing the mushrooms once they were soft, and I'm glad I did: the rice was then in with just the shallots, so it had more chance to get creamy and thick. I actually removed the mushrooms to the same little saucepan as the stock, which I heated over the lowest flame possible so that it was just below simmering the entire time, but hot so that it didn't lower the temp of the rice every time I ladled more in. Then I just used a ladle to scoop broth (but no mushrooms if I could help it) into the rice gradually, one or two ladles at a time.
I did use less butter at the end, since I had less rice, and because it was already delicious and didn't need that much added richness (or fat!).
Wednesday, January 21, 2009
Chiang Mer
My sister and her friend have had this dish twice at Spice Island in Pittsburgh (the restaurant owned by East Side Girl's hubby), and they both love it even though it is much more spicy than they prefer. I recently bought a jar of mild curry paste from the Indian secion at Wegman's and decided to try to reproduce the dish, and I did pretty well with Hannah's help!
Spice Island's menu describes the dish like this:
Chiang Mai Noodles
Wheat noodles in red curry sauce with minced chicken, hot peppers, carrot, mushroom, onion, and cilantro.
I was going for not so spicy, and I didn't have mushrooms or cilantro, so here's what I did:
Ingredients:
- 1/2 lb of spaghetti, cooked & drained
- 1 big or 2 small boneless, skinless chicken breasts, cut into bite-sized pieces
- 1 onion, diced
- 1 carrot, diced
- mild curry paste
- tomato paste
Optional:
- sliced mushrooms
- fresh cilantro
- 1 can crushed tomato, drained
Directions:
Cook the spaghetti
While I waited for the water to boil etc. I made the rest:
- Heat a little oil in a pan (the curry paste is oil-based, so only use just enough to cook the veggies)
- Sautee the onion and carrot in the oil until soft
- Add the chicken and sautee until cooked through
- Add 4 generous Tablespoons of mild curry paste
- Add a hearty squirt of tomato paste (about 2 Tablespoons)
- Continue cooking until sauce is heated and everything is done
- Add the cooked, drained spaghetti and stir it around with the heat still on low until everything is mixed and delicious-looking
- Scoop it onto a plate and enjoy!
The above made two perfect medium-large helpings, one for me and one for my hubby.
The "mild" curry paste I had still packed plenty of bite for my tastes, so I wouldn't add any hot pepper, but would definitely add mushrooms and cilantro if I plan ahead better next time. However, the dish was delicious without them.
The other thing I will definitely change next time is to use a little less curry paste and add a whole small can of tomato paste, and perhaps also a small can of crushed tomatoes (drained as much as possible). It was delicious, but I think it would have been even better with some more tomato, even if I had to cook it longer to get rid of the extra liquid. If adding the crushed tomatoes is going to give me a lot of extra liquid, I would just brown the chicken quickly at first but not cook it completely so that it could cook the rest of the way as the sauce simmered and reduced.
I hope to make this again soon with the added ingredients, so I'll let you know how it turns out then!
Subscribe to:
Posts (Atom)